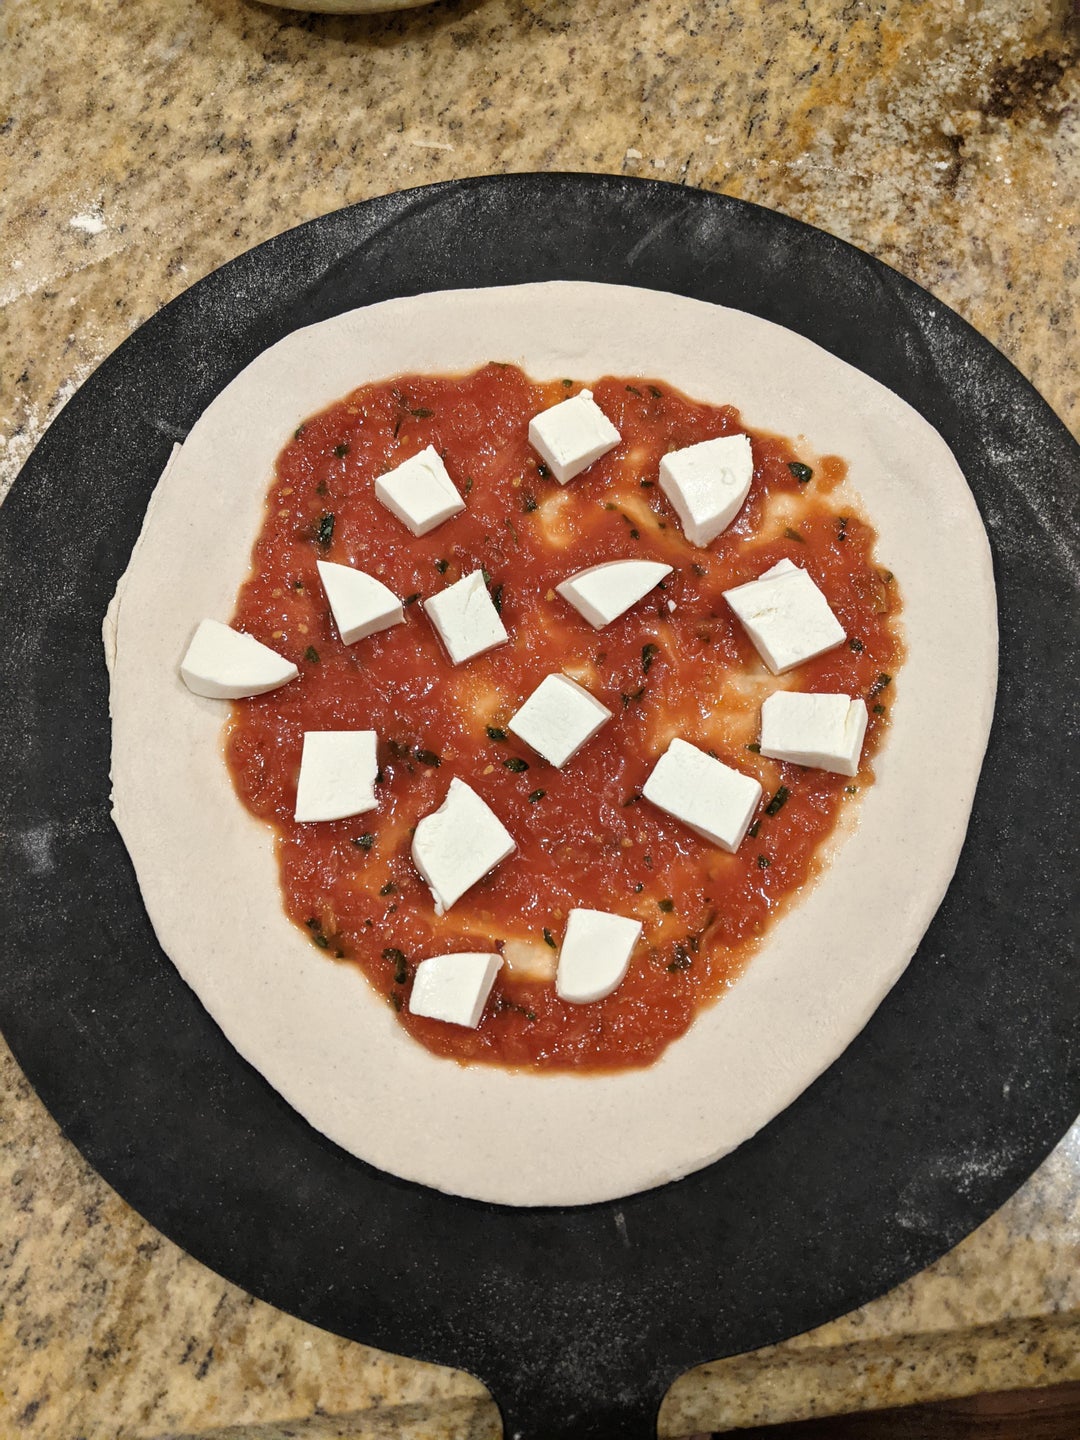
Recipe for 3 pizzas at 65% hydration, each 300 grams Ingredients: – 100g levain (100% water), at peak (rose 2.5-3x) – 490g 00 blue caputo flour – 302g water – 16g salt (3%)
Recipe: – Combine levain, flour and water in Kitchen-Aid and mix on low (or by hand) until just combined. Let sit for ~30 mins – Add salt and mix on low for 6-8 mins or knead for 10-15 mins – Leave covered at room temp (mine was low 70s f) for ~5 hours, or until see 20-30% rise – Split into individual balls, pinch on bottom to close and place into very lightly-oiled container. Place in the coldest part (likely lowest) part of your fridge for 2-3 days (these were 2 days) – Take out and put at room temp 2-3 hours before you intend to bake, use when dough balls feel a bit puffy and springy to the touch (but not too springy, a slight indentation should slowly fill back in.. if it springs back immediately then they’re not yet proofed enough) – Launch at 800-800f, bake on medium-high heat
Reflections: – 1) Taste: I’ve tried many different dough recipes: active dry yeast, ADY+poolish, ADY+biga, each with a slow rise and multiple days cold ferment in the fridge, but this sourdough crust was by far the tastiest I’ve made. It’s a bit harder to work with sourdough (I have a couple years of experience with sourdough bread baking so am pretty comfortable with it) but I felt it was worth it and likely won’t be going back. It wasn’t sour, just full of flavor and good chew.
– 2) Sourdough proofing strategy: the yeast in active and instant dry yeast are a different species than the yeast in sourdough; in my experience, ADY and IDY will continue to (slowly) grow and proof in the fridge (even at the bottom of my fridge at 35f), while sourdough also grows but much less so in the fridge, its proofing is much more actually retarded. Another difference is that I think it’s easier to overproof sourdough .. if it’s overproofed then it won’t get much of a rise at all during the bake, while with ADY and IDY the yeast are more resilient and will still give some decent rise during a bake. So with sourdough I think it’s safer to err on the side of a shorter RT proof so that there is less growth of yeast and potential activity in the fridge.. just enough so that flavor is being developed, but not enough to easily overproof as it continues to slowly grow in the fridge, and especially because there will be more proofing activity once the dough is taken out of the fridge and needs to come to room temp before shaping. If you err on the side of less RT proofing, then you have a bit more control of using the dough before it overproofs by keeping it on the counter after taking it out of the fridge and keeping an eye on it. In my case I got some nice rise in the crust but could have gotten even more, I’ll be proofing it a tad longer next time.
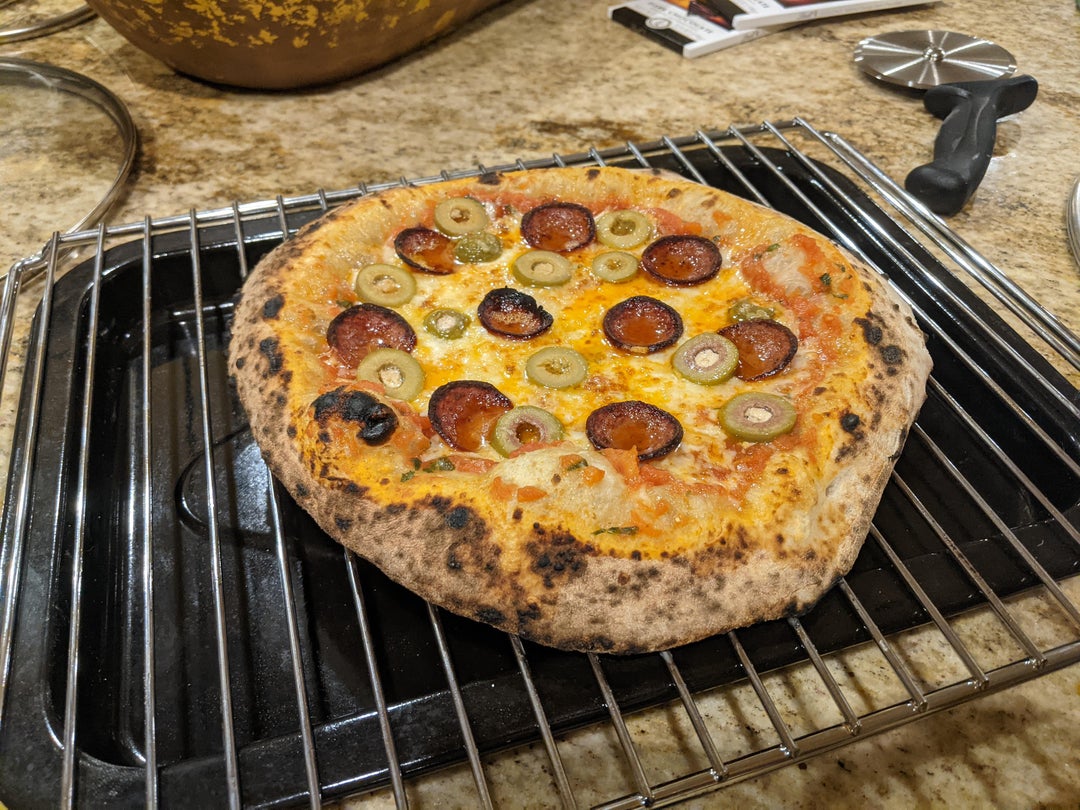
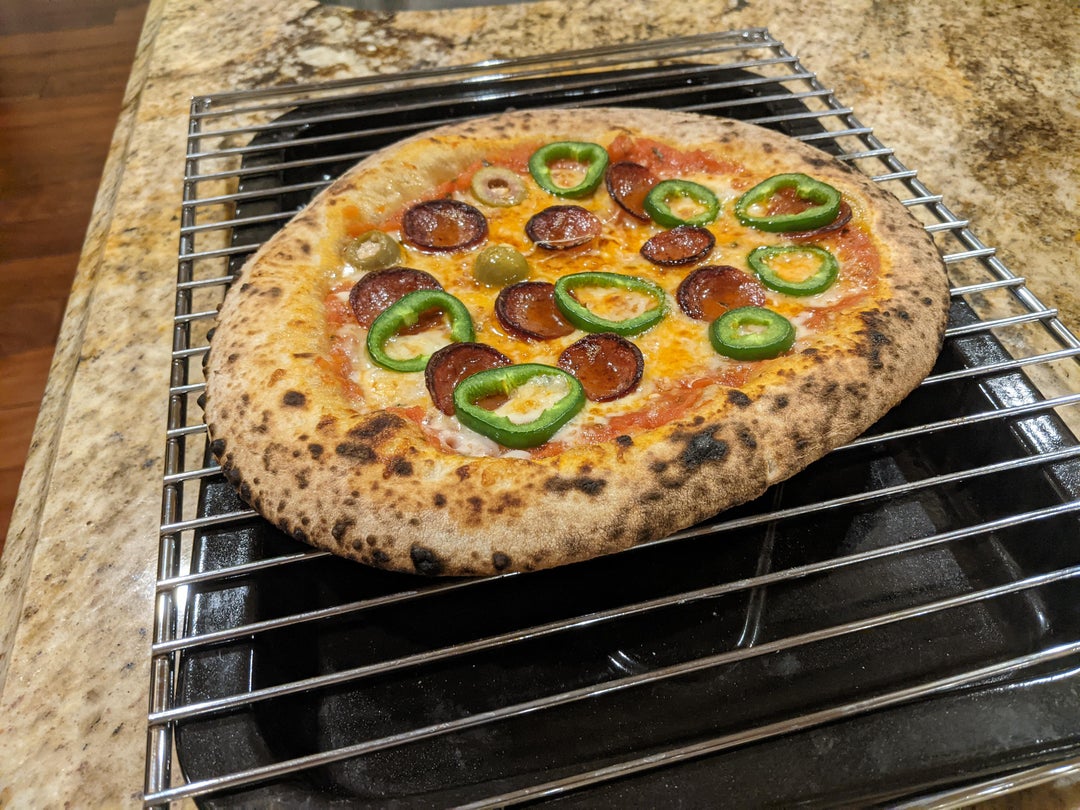
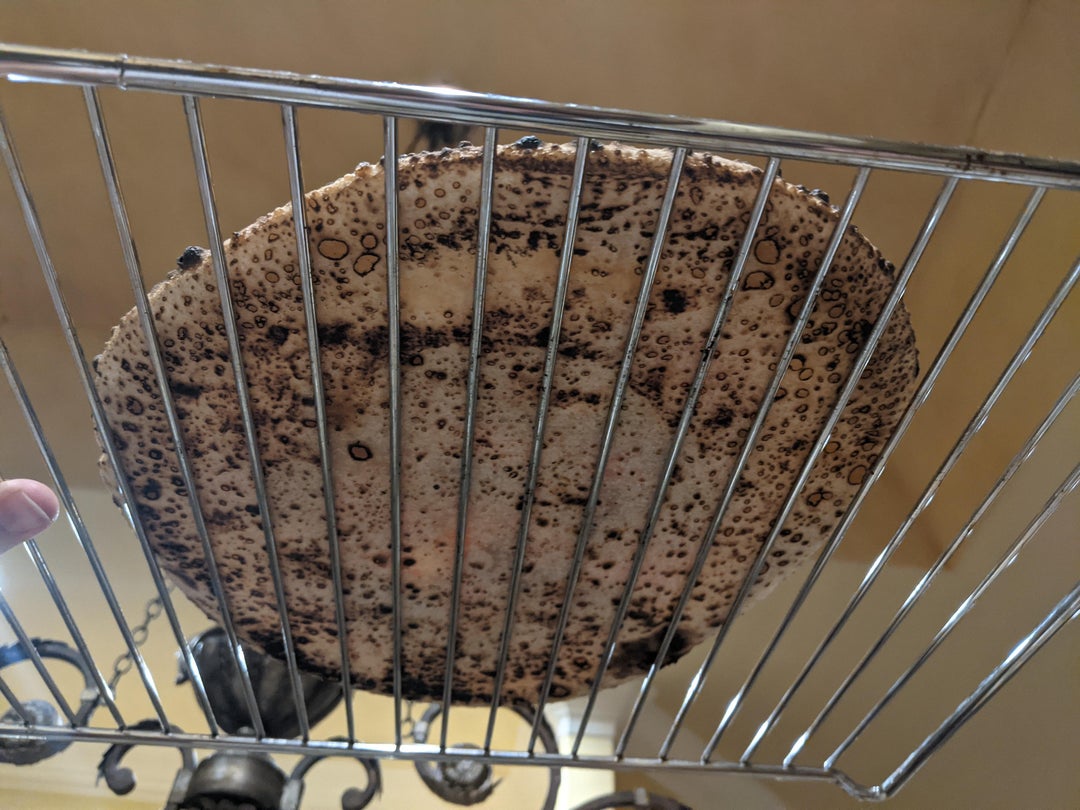
– 3) Baking temp: this was definitely the most interesting learning for me. If you look at the first 3 pics, these were the order of the pizzas I made: first the pep+olives, then the margarita and then the pep+jalapenos. I aimed for a stone temp of 800-850f before launching each of them, but the pep+olives I baked with the temperature knob set to the highest. It got a nice rise but the peps were burning a bit and I realized leaving it at that temp would torch the toppings, so for the margarita I preheated the oven at the highest temp again but lowered it to about 30% heat (not all the way down to the lowest, but a little above it) right before launching. You can see that these two pizzas while using the exact same dough turned out looking very different! The pep didn’t have the dark cornichon spots, it was just browner with some light leoparding throughout, and tasted almost pleasantly sweet (even though there was no sugar/honey added to the recipe .. my hunch is it was likely the sugars in the flour getting slightly caramelized in the higher heat). The margarita turned out I think like what a lot of us pizza nerds on here look for.. still very tasty (though not noticeably sweet) but with a bunch of cornichons throughout.
– In my experience, my friends and family (non pizza nerds) usually don’t really like the tons-of-cornichons ones because a lot of those parts of the crust just taste burnt and are a bit offputting. I don’t much mind them but I can understand, and now that I’ve tried both I much prefer the browner one (and now that I think about it, it looks very much like a really delicious pizza I recently had at a brick oven place in Brooklyn.. they really knew what they were doing). For the third pizza I again pre-heated at the highest temp but turned it down to around 70% before launching. The result was perfect: that same browning but the toppings weren’t burnt. This will be my go-to going forward. I used to be intimidated by baking at a high heat because I didn’t yet have good turning peel skills and would burn my pizzas repeatedly by frustratingly leaving them in the same spot in the oven for too long because I wasn’t effectively turning them, or pushing them against the back of the oven (Ooni rites of passage?), so it takes some practice but I think is worth it to bake at the higher temp.
– 4) Size of dough balls: I aimed for 300g balls and these made a perfect ~10-11” pizza if I had to guess (that’s a 14” shaping peel in the last pic, and there was plenty of room in the Ooni 16). The middle of the pizza was thin but not too thin, still had a nice bite and chew to it. It took 2.5 of the pizzas to feed 3 of us and we had leftovers for the next day. If I was feeding a bigger crowd I’d increase the pizzas to maybe 330g next time.
– 5) Quality pepperonis: special shoutout to Boar’s Head brand pepperoni; not sure if they’re available outside of the US but they’re a national brand here and should be found in most supermarkets. I buy the stick and cut the slices to a thickness somewhere between a dime and a nickel. They cup up nicely and everyone comments on how delicious they are, and I agree.
dusibello
That Margherita is sexy…
TemporaryData
Not bad! Fyi, Neapolitan pizza doesn’t require cooling, just plate it and eat it asap. Focaccia, instead, requires cooling on a tray to develop a crispy crust.


3 Comments
Recipe for 3 pizzas at 65% hydration, each 300 grams
Ingredients:
– 100g levain (100% water), at peak (rose 2.5-3x)
– 490g 00 blue caputo flour
– 302g water
– 16g salt (3%)
Recipe:
– Combine levain, flour and water in Kitchen-Aid and mix on low (or by hand) until just combined. Let sit for ~30 mins
– Add salt and mix on low for 6-8 mins or knead for 10-15 mins
– Leave covered at room temp (mine was low 70s f) for ~5 hours, or until see 20-30% rise
– Split into individual balls, pinch on bottom to close and place into very lightly-oiled container. Place in the coldest part (likely lowest) part of your fridge for 2-3 days (these were 2 days)
– Take out and put at room temp 2-3 hours before you intend to bake, use when dough balls feel a bit puffy and springy to the touch (but not too springy, a slight indentation should slowly fill back in.. if it springs back immediately then they’re not yet proofed enough)
– Launch at 800-800f, bake on medium-high heat
Reflections:
– 1) Taste: I’ve tried many different dough recipes: active dry yeast, ADY+poolish, ADY+biga, each with a slow rise and multiple days cold ferment in the fridge, but this sourdough crust was by far the tastiest I’ve made. It’s a bit harder to work with sourdough (I have a couple years of experience with sourdough bread baking so am pretty comfortable with it) but I felt it was worth it and likely won’t be going back. It wasn’t sour, just full of flavor and good chew.
– 2) Sourdough proofing strategy: the yeast in active and instant dry yeast are a different species than the yeast in sourdough; in my experience, ADY and IDY will continue to (slowly) grow and proof in the fridge (even at the bottom of my fridge at 35f), while sourdough also grows but much less so in the fridge, its proofing is much more actually retarded. Another difference is that I think it’s easier to overproof sourdough .. if it’s overproofed then it won’t get much of a rise at all during the bake, while with ADY and IDY the yeast are more resilient and will still give some decent rise during a bake. So with sourdough I think it’s safer to err on the side of a shorter RT proof so that there is less growth of yeast and potential activity in the fridge.. just enough so that flavor is being developed, but not enough to easily overproof as it continues to slowly grow in the fridge, and especially because there will be more proofing activity once the dough is taken out of the fridge and needs to come to room temp before shaping. If you err on the side of less RT proofing, then you have a bit more control of using the dough before it overproofs by keeping it on the counter after taking it out of the fridge and keeping an eye on it. In my case I got some nice rise in the crust but could have gotten even more, I’ll be proofing it a tad longer next time.
– 3) Baking temp: this was definitely the most interesting learning for me. If you look at the first 3 pics, these were the order of the pizzas I made: first the pep+olives, then the margarita and then the pep+jalapenos. I aimed for a stone temp of 800-850f before launching each of them, but the pep+olives I baked with the temperature knob set to the highest. It got a nice rise but the peps were burning a bit and I realized leaving it at that temp would torch the toppings, so for the margarita I preheated the oven at the highest temp again but lowered it to about 30% heat (not all the way down to the lowest, but a little above it) right before launching. You can see that these two pizzas while using the exact same dough turned out looking very different! The pep didn’t have the dark cornichon spots, it was just browner with some light leoparding throughout, and tasted almost pleasantly sweet (even though there was no sugar/honey added to the recipe .. my hunch is it was likely the sugars in the flour getting slightly caramelized in the higher heat). The margarita turned out I think like what a lot of us pizza nerds on here look for.. still very tasty (though not noticeably sweet) but with a bunch of cornichons throughout.
– In my experience, my friends and family (non pizza nerds) usually don’t really like the tons-of-cornichons ones because a lot of those parts of the crust just taste burnt and are a bit offputting. I don’t much mind them but I can understand, and now that I’ve tried both I much prefer the browner one (and now that I think about it, it looks very much like a really delicious pizza I recently had at a brick oven place in Brooklyn.. they really knew what they were doing). For the third pizza I again pre-heated at the highest temp but turned it down to around 70% before launching. The result was perfect: that same browning but the toppings weren’t burnt. This will be my go-to going forward. I used to be intimidated by baking at a high heat because I didn’t yet have good turning peel skills and would burn my pizzas repeatedly by frustratingly leaving them in the same spot in the oven for too long because I wasn’t effectively turning them, or pushing them against the back of the oven (Ooni rites of passage?), so it takes some practice but I think is worth it to bake at the higher temp.
– 4) Size of dough balls: I aimed for 300g balls and these made a perfect ~10-11” pizza if I had to guess (that’s a 14” shaping peel in the last pic, and there was plenty of room in the Ooni 16). The middle of the pizza was thin but not too thin, still had a nice bite and chew to it. It took 2.5 of the pizzas to feed 3 of us and we had leftovers for the next day. If I was feeding a bigger crowd I’d increase the pizzas to maybe 330g next time.
– 5) Quality pepperonis: special shoutout to Boar’s Head brand pepperoni; not sure if they’re available outside of the US but they’re a national brand here and should be found in most supermarkets. I buy the stick and cut the slices to a thickness somewhere between a dime and a nickel. They cup up nicely and everyone comments on how delicious they are, and I agree.
That Margherita is sexy…
Not bad! Fyi, Neapolitan pizza doesn’t require cooling, just plate it and eat it asap. Focaccia, instead, requires cooling on a tray to develop a crispy crust.